Mini Red Velvet Cheesecake
Highlighted under: Deluxe Baking Inspirations
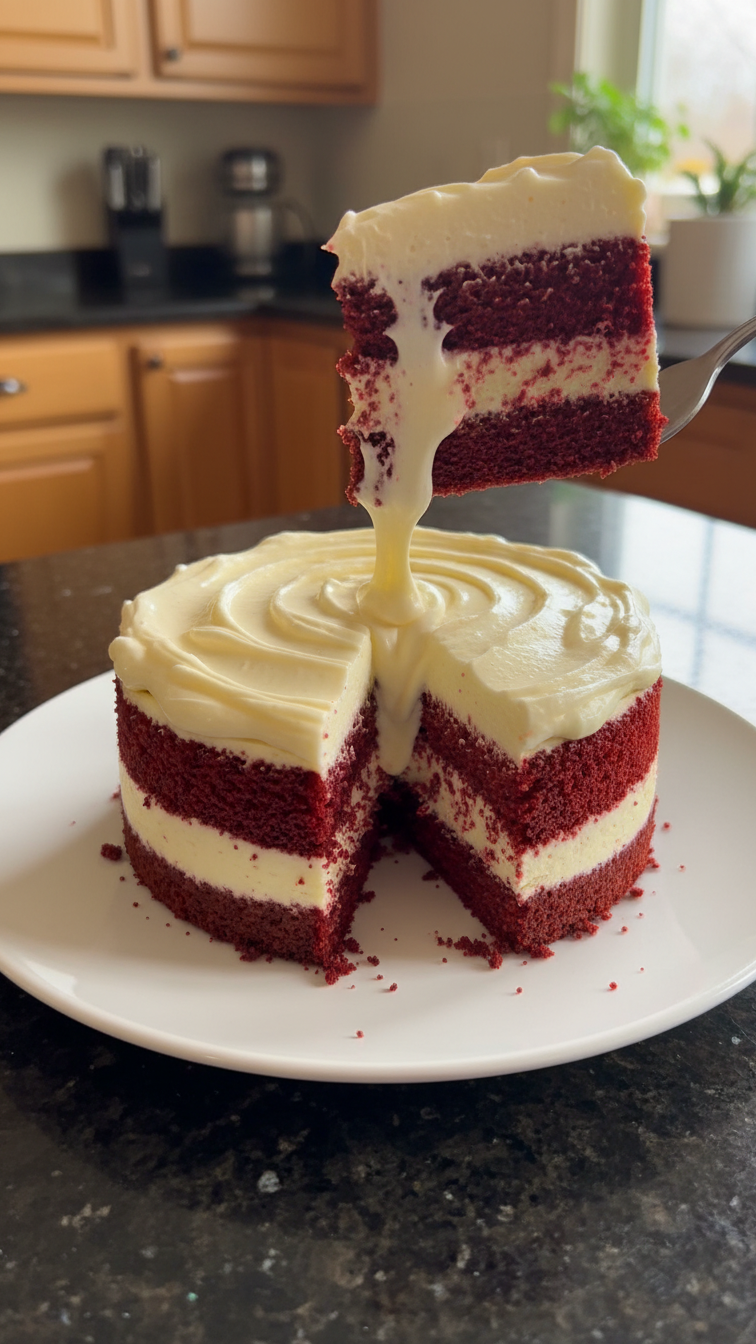
I love to make these Mini Red Velvet Cheesecakes for gatherings because they're the perfect blend of flavor and presentation. Each individual cheesecake captures the delightful taste of classic red velvet while combining the creamy richness of cheesecake. They are simple enough to whip up, yet elegant enough to impress guests. When I bring them out for dessert, everyone can’t wait to dig in. Plus, buttermilk and a hint of cocoa give these treats the perfect texture and flavor that is simply irresistible.
While experimenting with cheesecake flavors, I stumbled upon the idea of red velvet, and I was hooked! The pairing of bright red hue and velvety smooth cheese is visually captivating, but the taste is what truly steals the show. To make it even better, I topped each with a fluffy cream cheese frosting that takes these mini cheesecakes over the top.
The key to achieving that classic red velvet flavor lies in the buttermilk and vinegar combination, which adds tenderness and balances the sweetness. I also learned that using room temperature ingredients for the cheesecake ensures a smooth batter, preventing any lumps and resulting in a creamy texture.
Why You'll Love These Mini Red Velvet Cheesecakes
- Rich chocolate flavor paired with fresh cream cheese frosting
- Eyecatching presentation with the perfect balance of sweetness
- Great for special occasions or just a delightful treat
Perfecting the Cheesecake Filling
The key to achieving a smooth and creamy cheesecake filling is to ensure your cream cheese is fully softened before mixing. If it’s too firm, you risk ending up with lumps that won’t blend into the rich, velvety texture you desire. I typically leave my cream cheese out at room temperature for about 30 minutes before starting. This step, combined with gradually mixing in the granulated sugar, helps to create a silky batter ready for baking.
When adding the eggs to your cheesecake batter, incorporate them one at a time and mix just until combined. Mixing too vigorously or too long at this stage can introduce excess air into the batter, resulting in cracks during baking. Ideally, you want a smooth, uniform mixture, so take your time and ensure you scrape down the sides of the bowl to fully blend all the ingredients.
Baking for the Best Texture
Baking these mini cheesecakes at a moderate temperature of 325°F (160°C) allows for even cooking without over-browning the tops. Depending on your oven, monitor the cheesecakes closely, especially as they near the 20-minute mark. They should be set around the edges but still slightly jiggly in the center. This gentle baking method prevents them from puffing up too much and helps maintain a creamy interior, ensuring a delightful mouthfeel.
Once baked, it's important to allow the cheesecakes to cool completely in the tin before removing them. This gradual cooling process minimizes the risk of cracking, which often occurs if the cheesecakes are shocked by a temperature change. I recommend letting them sit on the counter for at least an hour, followed by a short chill in the fridge before frosting.
Ingredients
Gather your ingredients:
For the Cheesecake Crust
- 1 cup graham cracker crumbs
- 1/4 cup granulated sugar
- 1/2 cup unsalted butter, melted
For the Cheesecake Filling
- 16 oz cream cheese, softened
- 1 cup granulated sugar
- 2 large eggs
- 1/4 cup sour cream
- 2 tablespoons buttermilk
- 2 tablespoons red food coloring
- 1 teaspoon vanilla extract
- 1 teaspoon cocoa powder
- 1 tablespoon white vinegar
For the Cream Cheese Frosting
- 8 oz cream cheese, softened
- 1/4 cup unsalted butter, softened
- 2 cups powdered sugar
- 1 teaspoon vanilla extract
Make sure to measure your ingredients accurately for the best results!
Instructions
Follow these steps to make your Mini Red Velvet Cheesecakes:
Prepare the Crust
Preheat your oven to 325°F (160°C). In a mixing bowl, combine the graham cracker crumbs, sugar, and melted butter. Mix until well combined, then press the mixture evenly into the bottoms of a lined muffin tin.
Make the Cheesecake Filling
In a large bowl, beat the softened cream cheese until smooth. Gradually add in the granulated sugar and mix. Then, add the eggs one at a time, followed by the sour cream, buttermilk, food coloring, vanilla, cocoa powder, and vinegar. Mix until fully incorporated and smooth.
Bake
Pour the cheesecake filling over the prepared crusts in the muffin tin, filling each to about 3/4 full. Bake for 20-25 minutes, until the centers are set but slightly jiggly. Remove from the oven and let cool completely in the tin.
Prepare the Frosting
In a bowl, whip together the cream cheese and butter until smooth. Gradually add the powdered sugar and vanilla extract, mixing until fluffy.
Frost and Serve
Once the cheesecakes are cooled, remove them from the muffin tin and top each with a generous dollop of cream cheese frosting. Serve immediately or refrigerate until ready to serve.
Enjoy your homemade Mini Red Velvet Cheesecakes!
Pro Tips
- For a more intense red color, add a bit more red food coloring. Also, using room temperature ingredients will ensure a smoother batter and better texture.
Storing and Serving Tips
These mini red velvet cheesecakes can be made a day in advance, making them a perfect option for entertaining. Once cooled, store them in an airtight container in the refrigerator for up to three days. If you prefer serving them chilled, allow them to set in the fridge for at least two hours after frosting; this enhances their flavor and texture, giving the cream cheese frosting time to firm up slightly and meld with the cheesecake.
For a festive touch, you can garnish each cheesecake with chocolate shavings, red sprinkles, or a single raspberry right before serving. This not only adds visual appeal but also provides a burst of fresh flavor that complements the rich creaminess of the cheesecake.
Ingredient Substitutions
If you’re looking to make these mini cheesecakes gluten-free, substitute the graham cracker crumbs with gluten-free cookie crumbs or almond flour. While the flavor profile may change slightly, the crust will still hold together beautifully, providing a delicious base for the cheesecakes. Another option is to use crushed nuts mixed with a bit of melted butter for a more decadent crust.
To create a lighter version, consider swapping the sour cream with Greek yogurt, which maintains the tangy flavor while cutting down on fat. This also elevates the protein content of each cheesecake, making them a lighter indulgence without sacrificing taste.
Questions About Recipes
→ Can I make these cheesecakes in advance?
Absolutely! These cheesecakes keep well in the refrigerator for up to 3 days.
→ Can I freeze Mini Red Velvet Cheesecakes?
Yes, once fully cooled, you can freeze them for up to a month. Just wrap them well and thaw in the refrigerator before serving.
→ What if I don’t have buttermilk?
You can make a substitute using milk and vinegar. For every cup of buttermilk, mix 1 tablespoon of vinegar or lemon juice with enough milk to make 1 cup and let it sit for 5 minutes.
→ Can I add chocolate chips to the filling?
Definitely! Mini semi-sweet chocolate chips would be a delicious addition to the filling for some extra sweetness and texture.
Mini Red Velvet Cheesecake
Created by: The Dishjunction Team
Recipe Type: Deluxe Baking Inspirations
Skill Level: Intermediate
Final Quantity: 12 servings
What You'll Need
For the Cheesecake Crust
- 1 cup graham cracker crumbs
- 1/4 cup granulated sugar
- 1/2 cup unsalted butter, melted
For the Cheesecake Filling
- 16 oz cream cheese, softened
- 1 cup granulated sugar
- 2 large eggs
- 1/4 cup sour cream
- 2 tablespoons buttermilk
- 2 tablespoons red food coloring
- 1 teaspoon vanilla extract
- 1 teaspoon cocoa powder
- 1 tablespoon white vinegar
For the Cream Cheese Frosting
- 8 oz cream cheese, softened
- 1/4 cup unsalted butter, softened
- 2 cups powdered sugar
- 1 teaspoon vanilla extract
How-To Steps
Preheat your oven to 325°F (160°C). In a mixing bowl, combine the graham cracker crumbs, sugar, and melted butter. Mix until well combined, then press the mixture evenly into the bottoms of a lined muffin tin.
In a large bowl, beat the softened cream cheese until smooth. Gradually add in the granulated sugar and mix. Then, add the eggs one at a time, followed by the sour cream, buttermilk, food coloring, vanilla, cocoa powder, and vinegar. Mix until fully incorporated and smooth.
Pour the cheesecake filling over the prepared crusts in the muffin tin, filling each to about 3/4 full. Bake for 20-25 minutes, until the centers are set but slightly jiggly. Remove from the oven and let cool completely in the tin.
In a bowl, whip together the cream cheese and butter until smooth. Gradually add the powdered sugar and vanilla extract, mixing until fluffy.
Once the cheesecakes are cooled, remove them from the muffin tin and top each with a generous dollop of cream cheese frosting. Serve immediately or refrigerate until ready to serve.
Extra Tips
- For a more intense red color, add a bit more red food coloring. Also, using room temperature ingredients will ensure a smoother batter and better texture.
Nutritional Breakdown (Per Serving)
- Calories: 280 kcal
- Total Fat: 18g
- Saturated Fat: 10g
- Cholesterol: 95mg
- Sodium: 210mg
- Total Carbohydrates: 29g
- Dietary Fiber: 1g
- Sugars: 20g
- Protein: 4g