Silky Chocolate Pudding Cups
Highlighted under: Deluxe Baking Inspirations
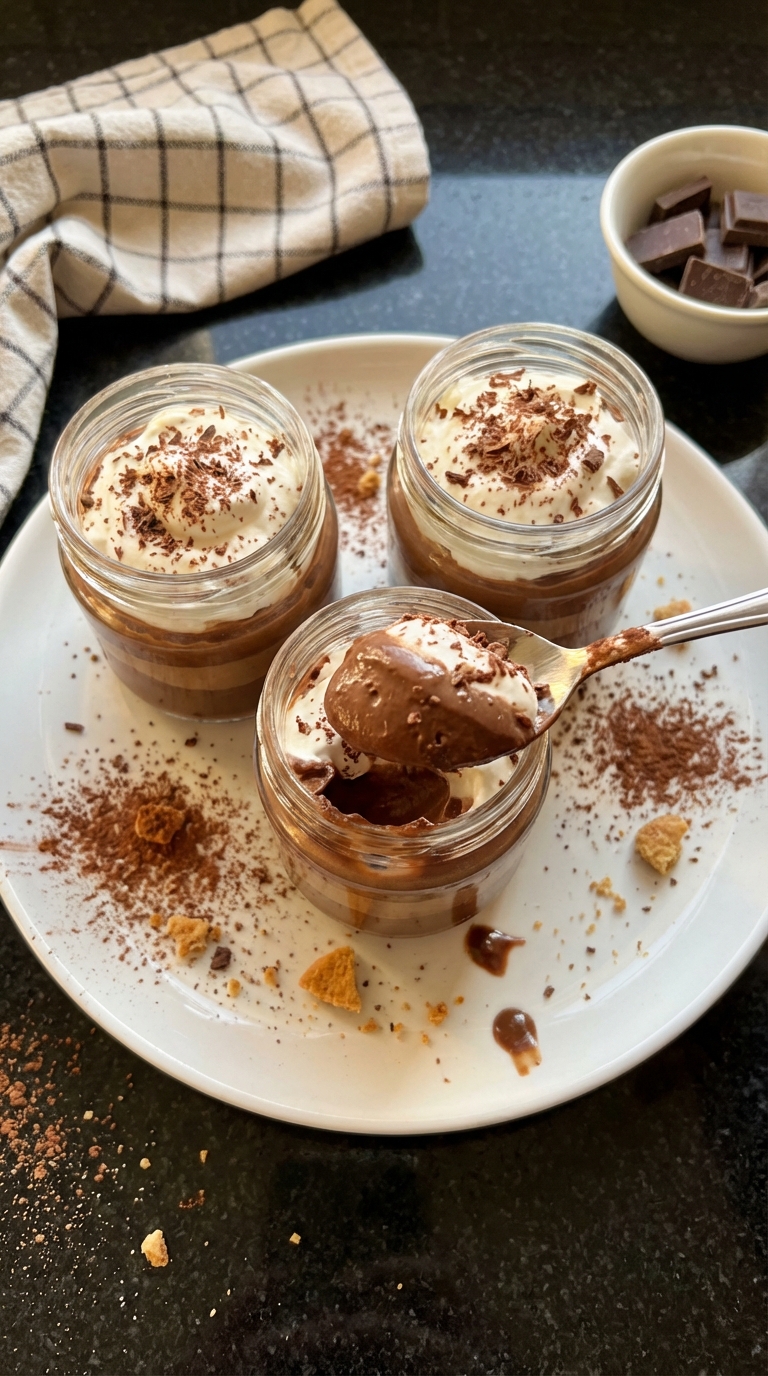
I absolutely love making Silky Chocolate Pudding Cups for friends and family. There’s something incredibly satisfying about whisking together rich, velvety chocolate with creamy ingredients that results in a dessert that's indulgent yet surprisingly simple. I like to serve them in small cups, allowing everyone to savor a little sweetness without feeling overwhelmed. Plus, the beautiful presentation makes these pudding cups perfect for special occasions or a cozy night in. Trust me, once you try them, you’ll be craving this dessert often!
When I first set out to make these Silky Chocolate Pudding Cups, I knew I wanted something that felt luxurious yet did not take all evening to prepare. I experimented with different ratios of chocolate and cream until I found the perfect balance that yields an irresistible smoothness. This pudding is not just a dessert; it's a little moment of joy in each cup.
One of the best tips I gathered through my trials was to use good quality chocolate; it truly elevates the entire recipe. A sprinkle of sea salt on top enhances the chocolate flavor even more, making each spoonful a delightful experience. You won't be able to stop at just one!
Why You'll Love This Recipe
- Rich chocolate flavor paired with fresh orange zest
- Creamy texture that melts in your mouth
- Perfect for celebrations or as a sweet indulgence
The Importance of Each Ingredient
Each ingredient in your Silky Chocolate Pudding Cups serves a unique purpose, enhancing both flavor and texture. The whole milk and heavy cream create a creamy base that contributes to the pudding’s luxurious mouthfeel. Whole milk provides richness while the heavy cream adds an extra layer of creaminess, ensuring that every spoonful melts beautifully on your tongue.
Cocoa powder gives this dessert its depth of flavor, but the type of cocoa you choose can make a difference. For a more intense chocolate flavor, opt for Dutch-processed cocoa powder, which has a smoother, less acidic profile. The granulated sugar balances the bitterness of the chocolate, while the cornstarch acts as a thickening agent, creating that irresistible silky texture.
Perfecting the Cooking Process
When cooking your pudding mixture, it's essential to whisk continuously as it heats. This prevents any lumps from forming and ensures a silky-smooth consistency. Keep your heat at medium—you want the mixture to come to a gentle bubble without boiling violently. Cooking time can vary slightly depending on your stove, but usually, it will take about 5 minutes to thicken properly.
Once you've added the dark chocolate and vanilla, resist the urge to rush cooling. Pour the pudding into cups while it's still warm; this helps it set effectively as it cools. Covering the cups with plastic wrap prevents a skin from forming on top, so be mindful to mold it snug against the surface.
Serving and Storing Tips
For the ultimate presentation, garnish your pudding with a dollop of freshly whipped cream and a sprinkle of chocolate shavings. This not only elevates the visual appeal but also adds contrasting textures; the light fluffiness of the cream against the dense pudding is delightful. Fresh berries or a hint of citrus zest can brighten the dish, making it feel more refreshing.
If you're preparing these pudding cups in advance, they can be made up to 2 days ahead. Just ensure they're stored in an airtight container in the refrigerator. If you find the pudding has thickened too much while chilling, you can gently stir in a splash of milk to loosen it before serving.
Ingredients
Ingredients
For the Pudding
- 2 cups whole milk
- 1/2 cup heavy cream
- 1/2 cup granulated sugar
- 1/3 cup unsweetened cocoa powder
- 1/4 cup cornstarch
- 1/4 teaspoon salt
- 5 ounces dark chocolate, chopped
- 1 teaspoon vanilla extract
For Garnish
- Whipped cream
- Chocolate shavings
- Fresh berries or zest (optional)
Make sure to read through the steps before getting started!
Instructions
Instructions
Mix Dry Ingredients
In a medium saucepan, whisk together the sugar, cocoa powder, cornstarch, and salt until well combined.
Combine Wet Ingredients
Gradually whisk in the milk and heavy cream. Place the saucepan over medium heat.
Cook the Mixture
Continue to whisk as the mixture heats and thickens, about 5 minutes, until it bubbles.
Add Chocolate
Remove from heat and stir in the chopped dark chocolate and vanilla extract until smooth.
Chill
Pour the pudding into cups and refrigerate for at least 1 hour before serving.
Serve
Top with whipped cream, chocolate shavings, and berries, if desired. Enjoy!
Enjoy your delicious Silky Chocolate Pudding Cups!
Pro Tips
- For an extra touch, consider adding a splash of espresso to enhance the chocolate flavor.
Creative Variations
While the classic Silky Chocolate Pudding is a treat on its own, consider adding a splash of espresso to the chocolate mixture for a mocha twist. This small addition can significantly enhance the chocolate flavor, providing a deeper, more complex taste profile that coffee lovers will adore.
For those who prefer a fruitier angle, try incorporating a fruit puree into the pudding. Raspberry or strawberry purees mixed in after cooking can give a delightful contrast to the chocolate, not just in flavor but also in color. Layering different flavors in clear cups can make for an eye-catching dessert at any gathering.
Troubleshooting Common Issues
If your pudding turns out lumpy, it’s likely due to not whisking enough during the cooking phase. If this happens, simply blend it in a food processor or use an immersion blender to smooth it out before cooling. This is a lifesaver when you're aiming for that signature silky texture.
Additionally, if you find that your pudding hasn't thickened as expected, it may have cooled down too much before the cooking time is complete. Don’t hesitate to return it to the heat on low while whisking continuously. Just remember to adjust the timeframe if it’s already been on the stove for a while, as overcooking could lead to a grainy texture.
Make-Ahead and Freezing Options
One of the best aspects of these pudding cups is their make-ahead potential. You can prepare them a day in advance, allowing the flavors to meld beautifully overnight in the refrigerator. Just keep them covered to ensure they're fresh when served. This is particularly helpful when planning a dinner party or special event.
If you're looking to store them longer, you can freeze the pudding for up to one month. Divide them into individual servings in freezer-safe containers. To enjoy, simply let them thaw in the refrigerator overnight. While the texture may vary slightly due to freezing, it will still give you that rich chocolate satisfaction when you're craving something sweet.
Questions About Recipes
→ Can I make this pudding ahead of time?
Absolutely! You can prepare it a day in advance and keep it refrigerated.
→ Is there a dairy-free option?
Yes, you can substitute the milk and cream with almond milk and coconut cream.
→ How long does this pudding last?
It will keep well in the fridge for up to 3 days if covered.
→ Can I use chocolate chips instead of chopped chocolate?
Yes, chocolate chips will work. Just ensure they’re high-quality for the best results.
Silky Chocolate Pudding Cups
Created by: The Dishjunction Team
Recipe Type: Deluxe Baking Inspirations
Skill Level: Easy
Final Quantity: 4 servings
What You'll Need
For the Pudding
- 2 cups whole milk
- 1/2 cup heavy cream
- 1/2 cup granulated sugar
- 1/3 cup unsweetened cocoa powder
- 1/4 cup cornstarch
- 1/4 teaspoon salt
- 5 ounces dark chocolate, chopped
- 1 teaspoon vanilla extract
For Garnish
- Whipped cream
- Chocolate shavings
- Fresh berries or zest (optional)
How-To Steps
In a medium saucepan, whisk together the sugar, cocoa powder, cornstarch, and salt until well combined.
Gradually whisk in the milk and heavy cream. Place the saucepan over medium heat.
Continue to whisk as the mixture heats and thickens, about 5 minutes, until it bubbles.
Remove from heat and stir in the chopped dark chocolate and vanilla extract until smooth.
Pour the pudding into cups and refrigerate for at least 1 hour before serving.
Top with whipped cream, chocolate shavings, and berries, if desired. Enjoy!
Extra Tips
- For an extra touch, consider adding a splash of espresso to enhance the chocolate flavor.
Nutritional Breakdown (Per Serving)
- Calories: 380 kcal
- Total Fat: 26g
- Saturated Fat: 15g
- Cholesterol: 195mg
- Sodium: 85mg
- Total Carbohydrates: 32g
- Dietary Fiber: 3g
- Sugars: 24g
- Protein: 6g