Easy Homemade Cheese Danish: An Incredible Ultimate Recipe You’ll Love
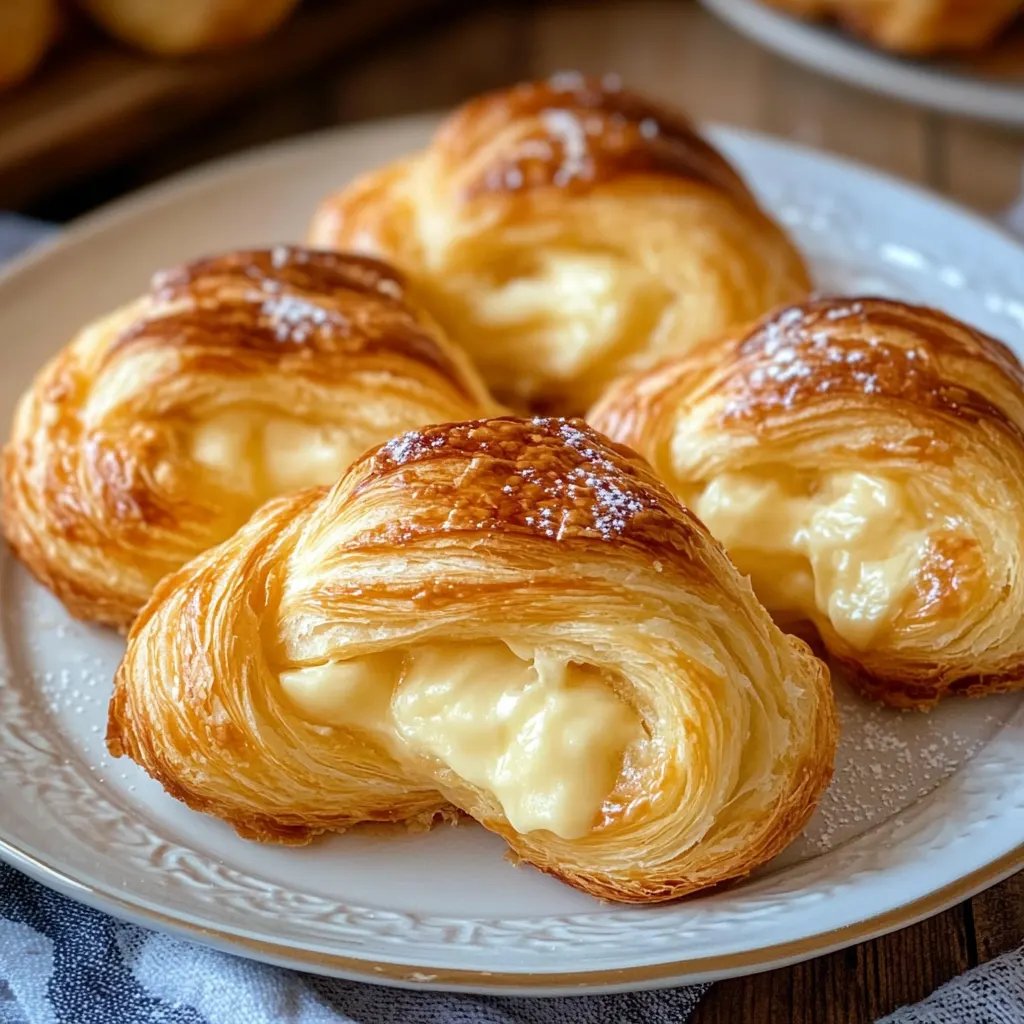
Easy Homemade Cheese Danish is a delightful treat that brings the taste of a bakery right into your kitchen. This simple yet luxurious pastry combines flaky layers of dough with a creamy, sweet cheese filling. Just thinking about them can make your mouth water! Whether for a breakfast treat, a brunch gathering, or a coffee break snack, these cheesecakes are sure to impress.
If you’ve ever wanted to enjoy the amazing flavors of a Cheese Danish without having to leave your home, you’re in luck! This straightforward recipe allows you to create a truly delicious pastry experience. You’ll discover the joy of making these Danish pastries from scratch, which not only tastes heavenly but also fills your kitchen with a warm, inviting aroma. In this article, I’ll guide you through the entire process, starting from why you’ll love it to how to serve it.
By the end, you will have the ultimate confidence to impress your family and friends with your baking skills, all while enjoying a wonderfully satisfying treat yourself. Let’s jump in and start making these delicious Easy Homemade Cheese Danishes!
Why You’ll Love This Recipe
The Easy Homemade Cheese Danish brings together a fabulous blend of flavors and textures that make it a must-try for anyone who loves pastries. Here are just a few reasons you’ll adore this recipe:
1. Easy Ingredients: Most of the ingredients are pantry staples, making it easy and convenient.
2. Impressive Appearance: These pastries have a beautiful finish, showcasing your baking prowess.
3. Customizable Filling: You can easily swap in your favorite fillings, like fruit or chocolate.
4. Perfect for Any Time: Whether for breakfast, dessert, or a snack, these pastries fit any occasion.
5. Satisfying and Delicious: The balance of buttery dough with creamy filling ensures each bite is heavenly.
6. Quick Preparation: This recipe allows for a relatively short prep and cook time, so you can enjoy them sooner.
With all these appealing attributes, it’s no wonder that Easy Homemade Cheese Danishes are a favorite treat for many!
Preparation and Cooking Time
Creating these delectable pastries doesn’t take long, making it a perfect choice for both busy mornings or leisurely weekends. Here’s how the time breaks down:
– Preparation Time: 20 minutes
– Cooking Time: 25-30 minutes
– Total Time: Approximately 50-60 minutes
These time estimates can vary slightly based on your skills and kitchen setup, but they serve as a great guideline for planning your baking adventure.
Ingredients
– 1 package (8 ounces) cream cheese, softened
– ½ cup powdered sugar
– 1 teaspoon vanilla extract
– 1 package (1 sheet) puff pastry, thawed
– 1 egg (for egg wash)
– ¼ cup granulated sugar (optional, for sprinkling)
– 1 teaspoon cinnamon (optional, for sprinkling)
Step-by-Step Instructions
Making Easy Homemade Cheese Danishes is a straightforward process. Follow these step-by-step instructions to create your delicious pastries:
1. Preheat the Oven: Preheat your oven to 400°F (200°C). This ensures even cooking for the pastries.
2. Prepare Filling: In a medium bowl, combine softened cream cheese, powdered sugar, and vanilla extract. Mix until smooth and set aside.
3. Prepare Puff Pastry: On a lightly floured surface, roll out the thawed puff pastry sheet. Cut it into squares or rectangles (about 4 inches each).
4. Form Pastry Base: Use a knife to gently score a smaller rectangle inside each square, about ½ inch from the edges. Be careful not to cut all the way through.
5. Add Filling: Place a generous spoonful of the cream cheese mixture into the center of each pastry square.
6. Fold Pastry Edges: Gently fold the edges of each square towards the center, overlapping slightly. You can pinch the corners to secure them.
7. Prepare Egg Wash: In a small bowl, beat the egg. Brush this mixture over the top of the pastries for a glossy finish.
8. Sprinkle Topping: If you like, mix equal parts of granulated sugar and cinnamon, then sprinkle this mixture over the pastries for extra sweetness and flavor.
9. Bake Pastries: Place the prepared pastries on a baking sheet lined with parchment paper. Bake in the preheated oven for about 25-30 minutes until puffed and golden brown.
10. Cool and Serve: Let the cheese Danishes cool slightly on a wire rack before serving. They are best enjoyed warm!
With these steps, you will confidently create your very own Easy Homemade Cheese Danish. The result is incredibly satisfying!
How to Serve
Serving your homemade Cheese Danishes can be as enjoyable as making them! Here are some ways to present and enhance the experience:
1. Presentation: Arrange the pastries on a lovely serving platter. A dusting of powdered sugar can elevate their visual appeal.
2. Accompaniments: These pastries can be served with fresh fruit, like berries or sliced apples, which complement the creamy filling beautifully.
3. Beverage Pairing: Pair your Danish with fresh coffee, tea, or a glass of cold milk for a refreshing taste combination.
4. Storage: If you have leftovers, store them in an airtight container in the refrigerator for a day or two. Reheat them in the oven for a few minutes to regain their flaky texture.
By thoughtfully considering how you serve your Easy Homemade Cheese Danishes, you create not only a delightful dish but a memorable experience for you and your guests. Enjoy!
Additional Tips
– Use Fresh Ingredients: Always use fresh cream cheese and eggs for the best flavor. Fresh ingredients can truly elevate the taste of your Easy Homemade Cheese Danish.
– Don’t Rush the Thawing: Allow the puff pastry to thaw completely in the refrigerator. Rushing this process can make the pastry more difficult to handle and affect the flakiness.
– Experiment with Flavors: Consider adding a hint of lemon or almond extract to the cream cheese filling for a unique twist. These flavors can add depth to the sweetness.
– Monitor Oven Temperature: Every oven is different. Keep an eye on your pastries in the oven to prevent overbaking or underbaking.
Recipe Variation
Get creative with different versions of Easy Homemade Cheese Danish! Here are a few ideas to try:
1. Fruit-Laden Filling: Add fresh fruit like blueberries, raspberries, or sliced strawberries to your cream cheese filling for an extra burst of flavor.
2. Chocolate Lovers: Mix in some chocolate chips to the cream cheese filling for a delicious chocolate twist.
3. Nutty Delight: Incorporate some toasted nuts into the filling for a delightful crunch. Almonds or walnuts work well for added texture.
4. Savory Option: For a twist, consider making a savory filling by mixing herbs and spices into the cream cheese mixture, creating a completely different pastry experience.
Freezing and Storage
Proper storage ensures that your Easy Homemade Cheese Danishes stay fresh longer:
– Storage: Keep any leftover pastries in an airtight container in the refrigerator. They are best enjoyed within 2-3 days but can last up to a week.
– Freezing: You can freeze the prepared, unbaked pastry for up to 2 months. Wrap each pastry tightly in plastic wrap and place them in a freezer-safe bag. When ready to bake, simply thaw in the refrigerator overnight and proceed with baking as instructed.
Special Equipment
Although making Easy Homemade Cheese Danishes doesn’t require special equipment, having the right tools can make the process smoother:
– Mixing Bowls: For mixing the filling and handling the dough.
– Rolling Pin: Essential for rolling out the puff pastry evenly.
– Baking Sheet: A sturdy sheet lined with parchment paper is crucial to prevent sticking during baking.
– Pastry Brush: To apply the egg wash and achieve that beautiful golden finish.
Frequently Asked Questions
Can I use store-bought cheese filling instead?
Yes, you can opt for a store-bought cheese filling if you’re short on time. However, homemade filling is often tastier.
What if I don’t have puff pastry?
You can use crescent roll dough as an alternative. It gives a different flavor but still creates a delightful texture.
Can I make this ahead of time?
Yes! You can prepare the filling the night before and assemble the pastries right before baking.
How do I know when my pastries are baked correctly?
Your Easy Homemade Cheese Danishes should be puffed and golden brown. If they look dry or dark, they might be overbaked.
Conclusion
Indulging in Easy Homemade Cheese Danishes is a gratifying experience. They are perfect for any occasion, whether a celebratory brunch or an afternoon snack. With the simple steps and variety of options available, you can customize this delightful pastry to suit any palate. An irresistible combination of flaky, buttery pastry and creamy filling awaits you, ready to impress your guests and elevate your baking skills. So, roll up your sleeves and enjoy the incredible world of homemade pastries!